Ձգտո՞ւմ եք ձեր PowerPoint ներկայացումները դարձնել պրոֆեսիոնալ և հեշտությամբ ճանաչելի։ Եթե ցանկանում եք ձեր PowerPoint սլայդներում ջրանիշ ավելացնել, ապա ճիշտ տեղում եք։ Այս բլոգում մենք կանդրադառնանք ջրանիշի կարևորությանը։ ջրանիշ PowerPoint-ում, ներկայացնում են PPT-ում ջրանիշ ավելացնելու պարզ քայլեր և նույնիսկ ցույց են տալիս, թե ինչպես անհրաժեշտության դեպքում հեռացնել դրանք։
Պատրաստվեք բացելու ջրանիշների ամբողջ ներուժը և ձեր PowerPoint շնորհանդեսները տեղափոխեք հաջորդ մակարդակ:
Բառը
- Ինչու՞ է պետք ջրանիշը PowerPoint-ում:
- Ինչպես ավելացնել ջրանիշը PowerPoint-ում
- Ինչպես PowerPoint-ում ավելացնել ջրանիշ, որը չի կարող խմբագրվել
- Հիմնական տուփեր
- Հաճ. տրվող հարցեր

Սկսեք վայրկյանների ընթացքում..
Գրանցվեք անվճար և կառուցեք ձեր ինտերակտիվ PowerPoint- ը ձևանմուշից:
Փորձեք այն անվճար ☁️
Ինչու՞ է պետք ջրանիշը PowerPoint-ում:
Ինչո՞ւ է ձեզ ճիշտ անհրաժեշտ ջրանիշը։ Ամեն ինչ պարզ է։ Ջրանիշը ծառայում է որպես տեսողական բրենդավորման գործիք և նպաստում է ձեր սլայդների պրոֆեսիոնալ տեսքին։ Այն օգնում է պաշտպանել ձեր բովանդակությունը, հաստատել սեփականության իրավունքը և ապահովել, որ ձեր ուղերձը մնայուն տպավորություն թողնի ձեր լսարանի վրա։
Մի խոսքով, PowerPoint-ում ջրի մակարդակի նշագիծը կարևոր տարր է, որը վստահություն, եզակիություն և պրոֆեսիոնալիզմ է հաղորդում ձեր ներկայացումներին:
Ինչպես ավելացնել ջրանիշը PowerPoint-ում
PowerPoint ներկայացմանը ջրանիշ ավելացնելը շատ հեշտ է։ Ահա քայլ առ քայլ ուղեցույց։
Քայլ 1Բացեք PowerPoint-ը և նավարկեք դեպի այն սլայդը, որտեղ ցանկանում եք ավելացնել ջրանիշը:
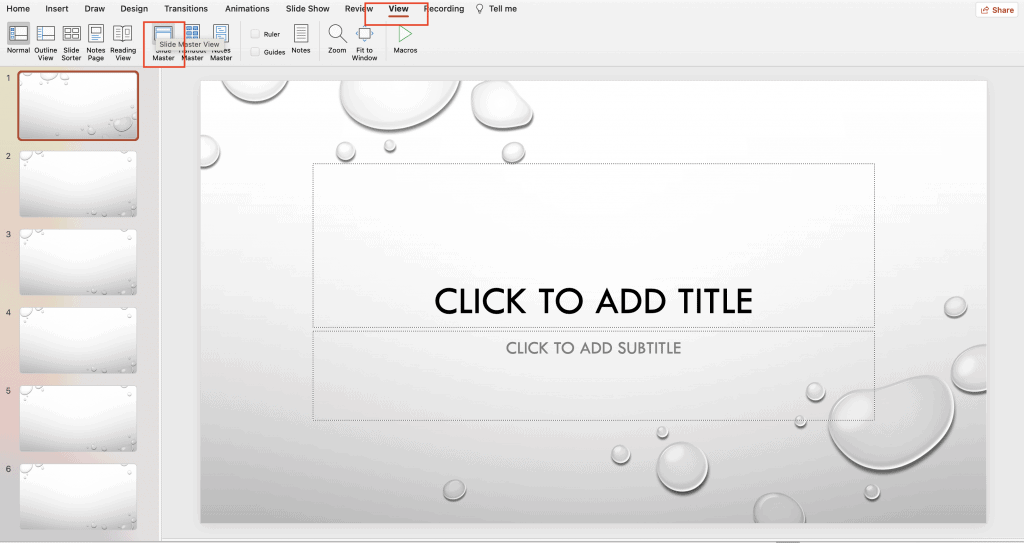
Քայլ 2: Սեղմեք մասին «Դիտել» ներդիրը PowerPoint ժապավենի վերևում:
Քայլ 3: Սեղմիր «Սլայդ վարպետ։»Սա կբացի Սլայդների գլխավոր էկրանը։
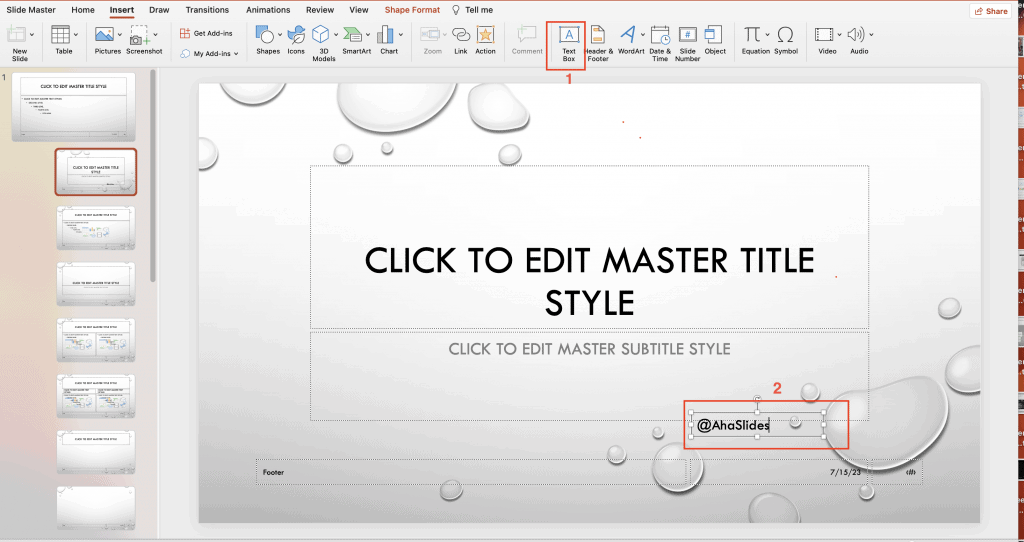
Քայլ 4: Ընտրել «Տեղադրեք» ներդիրը Slide Master դիտում:

Քայլ 5: Սեղմեք մասին «Տեքստ» or «Նկար» կոճակը «Ներդիր» ներդիրում, կախված նրանից, թե արդյոք ցանկանում եք ավելացնել տեքստային, թե պատկերային ջրանիշ։
- Տեքստային ջրանիշի համար ընտրեք «Տեքստային դաշտ» տարբերակը, այնուհետև սեղմեք և քաշեք սլայդի վրա՝ տեքստային դաշտ ստեղծելու համար: Տեքստային դաշտում մուտքագրեք ձեր ցանկալի ջրանիշի տեքստը, օրինակ՝ ձեր ապրանքանիշի անվանումը կամ «Սևագիրը»:
- Պատկերի վրա հիմնված ջրանիշի համար ընտրեք «Նկար» տարբերակը, զննեք ձեր համակարգիչը պատկերի ֆայլը, որը ցանկանում եք օգտագործել և սեղմեք «Տեղադրեք» այն սլայդին ավելացնելու համար:
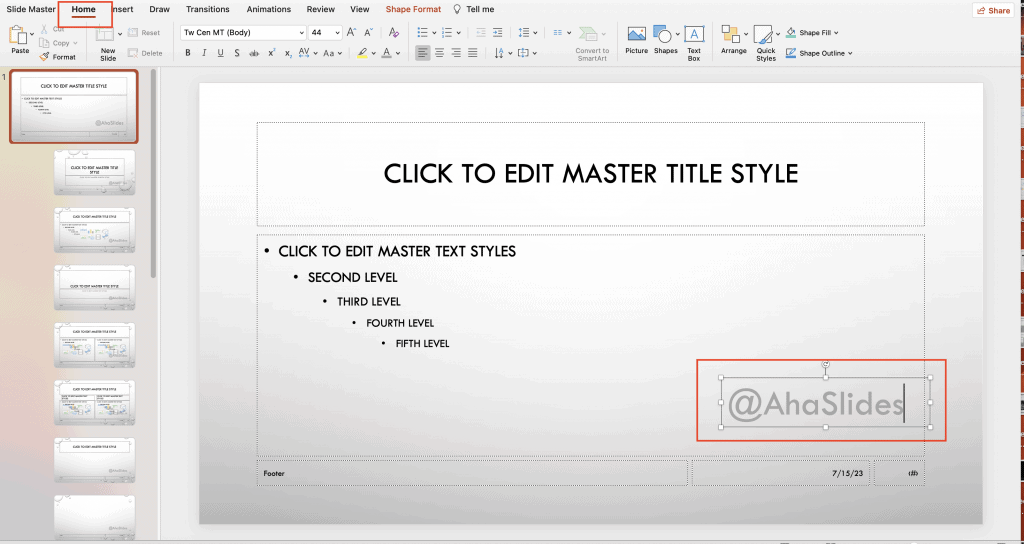
- Խմբագրեք և հարմարեցրեք ձեր ջրանիշը ըստ ցանկության: Դուք կարող եք փոխել ջրանիշի տառատեսակը, չափը, գույնը, թափանցիկությունը և դիրքը՝ օգտագործելով կոճակի ընտրանքները «Տուն» էջանիշը.
Քայլ 6: Երբ դուք գոհ եք ջրի մակարդակի նշագծից, սեղմեք կոճակի վրա «Փակել գլխավոր տեսքը» կոճակը «Սլայդ վարպետ» ներդիր՝ Slide Master տեսքից դուրս գալու և սովորական սլայդ տեսքին վերադառնալու համար:

Քայլ 7: Ձեր ջրանիշն այժմ ավելացվել է բոլոր սլայդներին: Դուք կարող եք կրկնել գործընթացը այլ PPT ներկայացումների համար, եթե ցանկանում եք, որ ջրի մակարդակի նշագիծը հայտնվի:
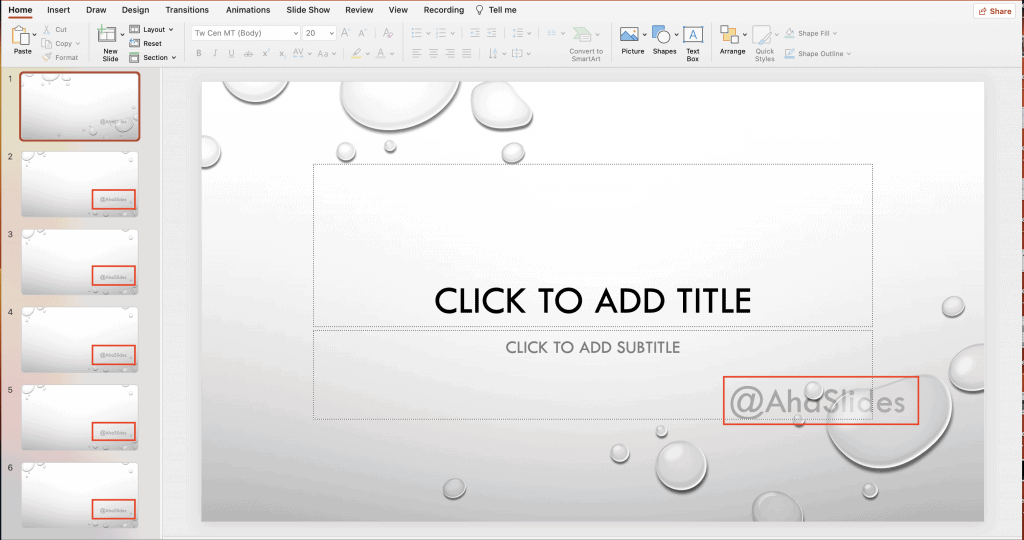
Այսքանը։ Հետևելով այս պարզ քայլերին՝ դուք կարող եք հեշտությամբ ջրանիշ ավելացնել ձեր PowerPoint ներկայացմանը և դրան տալ պրոֆեսիոնալ տեսք։
Ինչպես PowerPoint-ում ավելացնել ջրանիշ, որը չի կարող խմբագրվել
PowerPoint-ում ջրի մակարդակի նշագիծ ավելացնելու համար, որը չի կարող հեշտությամբ խմբագրվել կամ փոփոխվել ուրիշների կողմից, կարող եք օգտագործել որոշ տեխնիկա հետևյալ կերպ.
Քայլ 1: Բացեք PowerPoint-ը և նավարկեք դեպի այն սլայդը, որտեղ ցանկանում եք ավելացնել անփոփոխելի ջրանիշը:
Քայլ 2: Ընտրեք Սլայդ Վարպետ դիտել:
Քայլ 3: Պատճենեք «Տեքստ» կամ «Պատկեր» տարբերակը, որը ցանկանում եք օգտագործել որպես ջրանիշ:
Քայլ 4: Ջրի նշագիծն անխմբագրելի դարձնելու համար անհրաժեշտ է պատկերը/տեքստը որպես ֆոն դնել՝ պատճենելով այն «Ctrl+C».
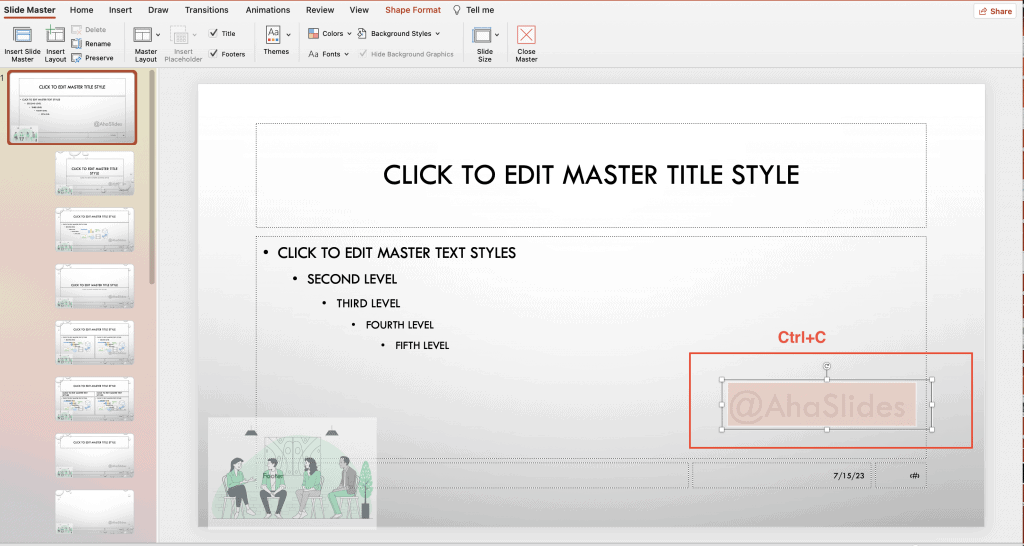
Քայլ 5: Սլայդի ֆոնի վրա սեղմեք աջ կոճակը և ընտրեք «Նկարի ձևաչափ» համատեքստի ընտրացանկից:
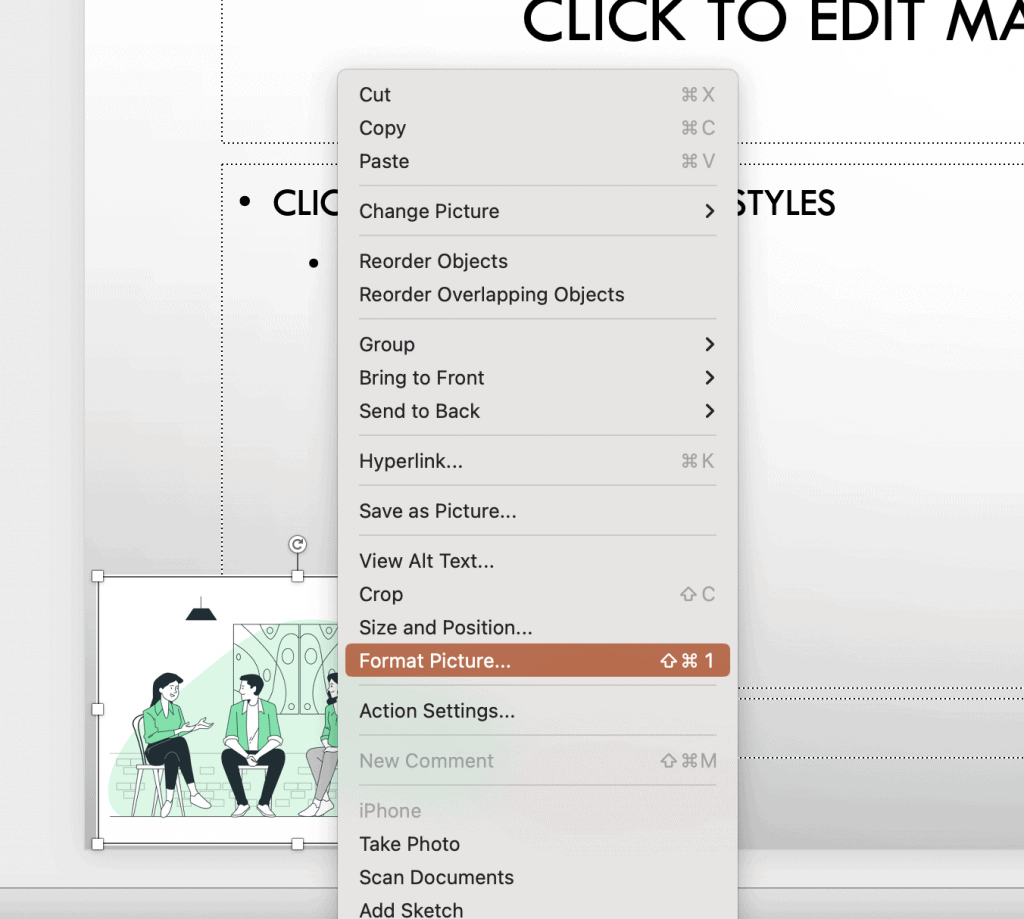
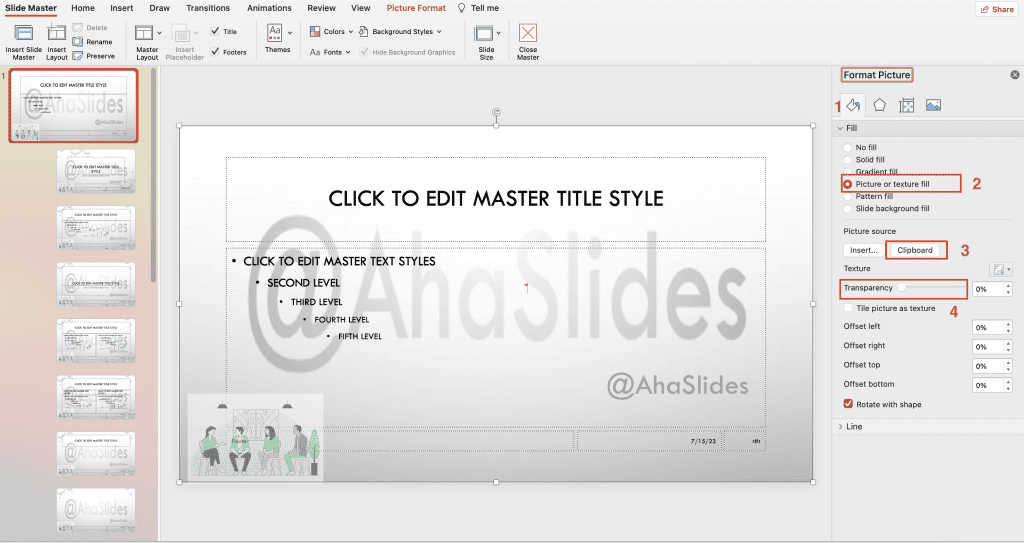
Քայլ 6: Է «Նկարի ձևաչափ» պատուհան, գնալ դեպի «Նկար» էջանիշը.
- Ստուգեք այն վանդակը, որն ասում է "Լրացնել" եւ ընտրեք «Նկարի կամ հյուսվածքի լրացում».
- Այնուհետեւ կտտացրեք «Clipboard» վանդակ՝ ձեր տեքստը/պատկերը որպես ջրանիշ տեղադրելու համար:
- Ստուգում «Թափանցիկություն» ջրի մակարդակի նշագիծը խունացած և ավելի քիչ ցայտուն դարձնելու համար:
Քայլ 7: Փակեք «Նկարի ձևաչափ» հաց.
Քայլ 8: Պահպանեք ձեր PowerPoint ներկայացումը ջրի մակարդակի նշագծի կարգավորումները պահպանելու համար:
Հետևելով այս քայլերին, դուք կարող եք ջրի մակարդակի նշագիծ ավելացնել ձեր PowerPoint սլայդներին, որոնք ավելի դժվար է խմբագրել կամ փոփոխել ուրիշների կողմից:
Հիմնական տուփեր
PowerPoint-ում ջրանիշը կարող է բարելավել ձեր շնորհանդեսների տեսողական գրավչությունը, ապրանքանիշը և պաշտպանությունը, անկախ նրանից, թե դուք օգտագործում եք տեքստային ջրանիշեր՝ գաղտնիությունը նշելու համար, թե պատկերային ջրանիշեր։
Ջրանիշեր ավելացնելով՝ դուք ստեղծում եք տեսողական ինքնություն և պաշտպանում եք ձեր բովանդակությունը։ Այսպիսով, հաջորդ անգամ, երբ PowerPoint ներկայացում եք պատրաստում, մի մոռացեք օգտագործել ջրանիշերի հզորությունը և դիտարկել դրանց ներառումը։ AhaSlides- ը ստեղծելով ինտերակտիվ և գրավիչ փորձառություն։ AhaSlides-ի առանձնահատկությունները բազմազան են, այդ թվում՝ կենդանի հարցումներ, վիկտորինաներ, եւ ինտերակտիվ հարց ու պատասխան նիստեր, դարձնելով ձեր ներկայացումները գրավիչ և ինտերակտիվ։
Խորհուրդներ. Օգտագործեք AhaSlides-ը որպես Mentimeter-ի լավագույն այլընտրանքներից մեկը, լավագույնների շարքում 7 այլընտրանք Մենտիին 2024- ում:
Հաճախակի տրվող հարցեր
Ի՞նչ է Powerpoint ջրանիշը:
PowerPoint սլայդի ջրանիշը կիսաթափանցիկ պատկեր կամ տեքստ է, որը հայտնվում է սլայդի բովանդակության հետևում: Սա հիանալի գործիք է մտավոր ինտելեկտը պաշտպանելու համար, որը նաև օգնում է հեղինակային իրավունքի հետ կապված խնդիրների դեպքում:
Ինչպե՞ս ավելացնել ջրանիշ PowerPoint-ում։
PowerPoint-ում ջրի մակարդակի նշագիծ ավելացնելու համար կարող եք հետևել հոդվածի 8 քայլերին, որոնք մենք հենց նոր տրամադրեցինք:
Ինչպե՞ս հեռացնել ջրանիշը PowerPoint-ի ներկայացումից Windows 10-ում:
Հիմնված Microsoft- ի աջակցությունԱհա Windows 10-ի PowerPoint-ի ներկայացումից ջրի նշագիծը հեռացնելու քայլերը.
1. Գլխավոր ներդիրում բացեք Ընտրության վահանակը: Օգտագործեք Ցուցադրել/Թաքցնել կոճակները ջրի մակարդակի նշագիծը փնտրելու համար: Ջնջել այն, եթե գտնվի:
2. Ստուգեք սլայդի հիմնական տարբերակը՝ «Դիտում» ներդիրում սեղմեք «Սլայդի հիմնական տարբերակը»։ Փնտրեք ջրանիշը սլայդի հիմնական տարբերակի և դասավորությունների վրա։ Ջնջեք այն, եթե այն գտնվի։
3. Ստուգեք ֆոնը. «Դիզայն» ներդիրում սեղմեք «Ձևաչափել ֆոնը» (Format Background), ապա՝ «Միատարր լցոնում» (Solid Fill): Եթե ջրանիշը անհետանում է, նշանակում է, որ դա նկարի լցոնում է եղել:
4. Նկարի ֆոնը խմբագրելու համար սեղմեք աջը, Save Background-ը և խմբագրեք պատկերի խմբագրում: Կամ ամբողջությամբ փոխարինեք նկարը:
5. Ստուգեք սլայդների բոլոր վարպետները, դասավորությունները և նախապատմությունները ջրի մակարդակի նշագիծն ամբողջությամբ հեռացնելու համար: Ջնջել կամ թաքցնել ջրանիշի տարրը, երբ գտնվի:


