PowerPointプレゼンテーションをプロフェッショナルで分かりやすいものにしたいと思いませんか?PowerPointスライドに透かしを追加したいなら、ここが最適な場所です。このブログ記事では、透かしの重要性について詳しく説明します。 PowerPointの透かし、PPT に透かしを追加する方法についての簡単な手順を提供し、必要に応じて透かしを削除する方法も示します。
ウォーターマークの可能性を最大限に引き出し、PowerPoint プレゼンテーションを次のレベルに引き上げる準備をしましょう。
目次
PowerPoint にウォーターマークが必要な理由
なぜ透かしが必要なのでしょうか?答えは簡単です。透かしは視覚的なブランディングツールとしてだけでなく、スライドのプロフェッショナルな印象を高める効果もあります。コンテンツを保護し、所有権を確立し、メッセージが聴衆に長く記憶に残るようにするのに役立ちます。
つまり、PowerPoint の透かしは、プレゼンテーションに信頼性、独自性、専門性を加える重要な要素です。
PowerPoint に透かしを追加する方法
PowerPointプレゼンテーションに透かしを追加するのは簡単です。手順は以下のとおりです。
ステップ 1: PowerPoint を開き、透かしを追加するスライドに移動します。
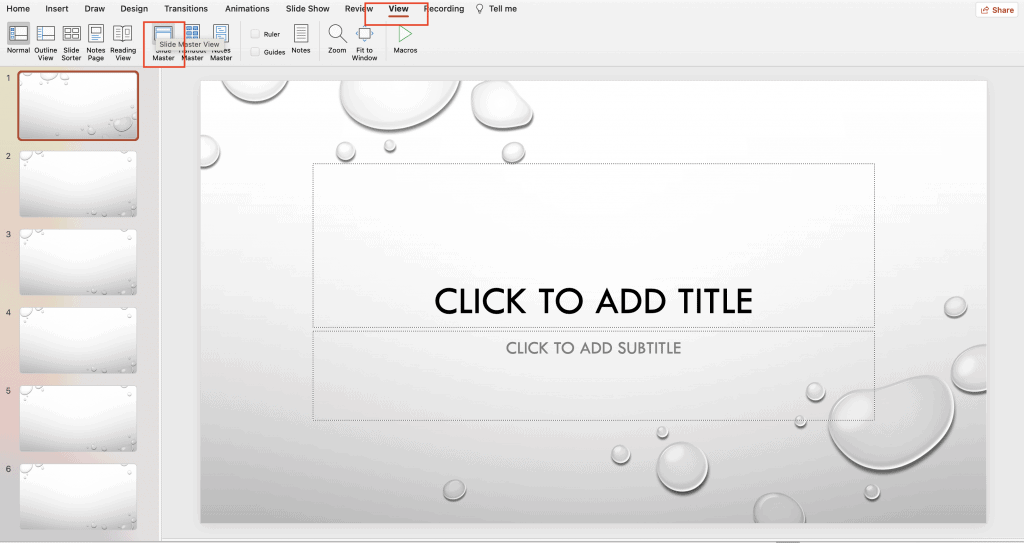
ステップ2: 以下を行うには、 "見る" PowerPoint リボンの上部にあるタブをクリックします。
ステップ3: ソフトウェアの制限をクリック 「スライドマスター。」スライドマスタービューが開きます。
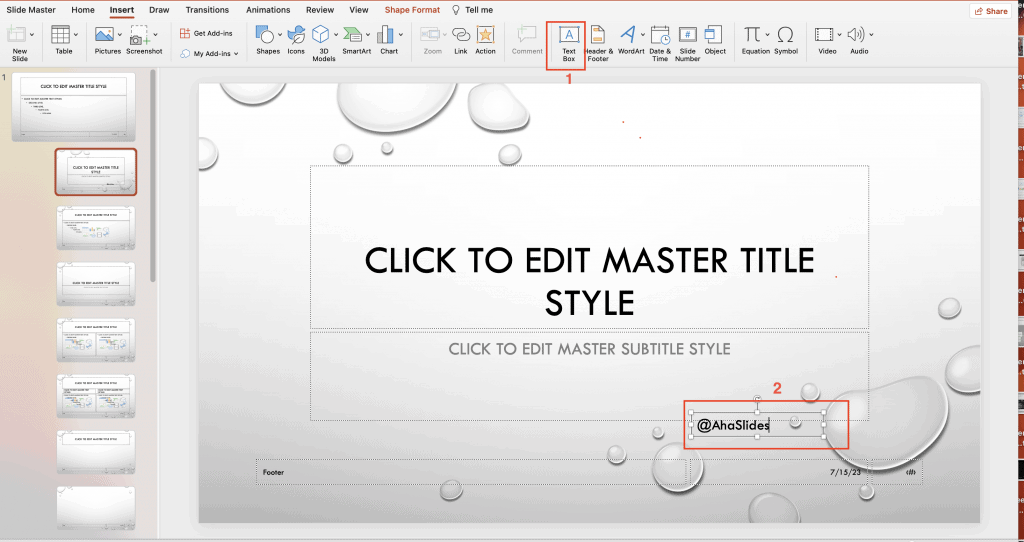
ステップ4: まず "入れる" スライド マスター ビューのタブ。

ステップ5: 以下を行うには、 "テキスト" or "画像" テキストベースの透かしを追加するか、画像ベースの透かしを追加するかに応じて、「挿入」タブのボタンをクリックします。
- テキストベースの透かしを追加するには、「テキストボックス」オプションを選択し、スライド上でクリック&ドラッグしてテキストボックスを作成します。テキストボックスに、ブランド名や「下書き」など、ご希望の透かしテキストを入力します。
- 画像ベースの透かしの場合は、 "画像" オプションで、コンピュータを参照して使用する画像ファイルを探し、クリックします。 "入れる" をクリックしてスライドに追加します。
- 必要に応じて透かしを編集およびカスタマイズします。 のオプションを使用して、透かしのフォント、サイズ、色、透明度、位置を変更できます。 「ホーム」 タブには何も表示されないことに注意してください。
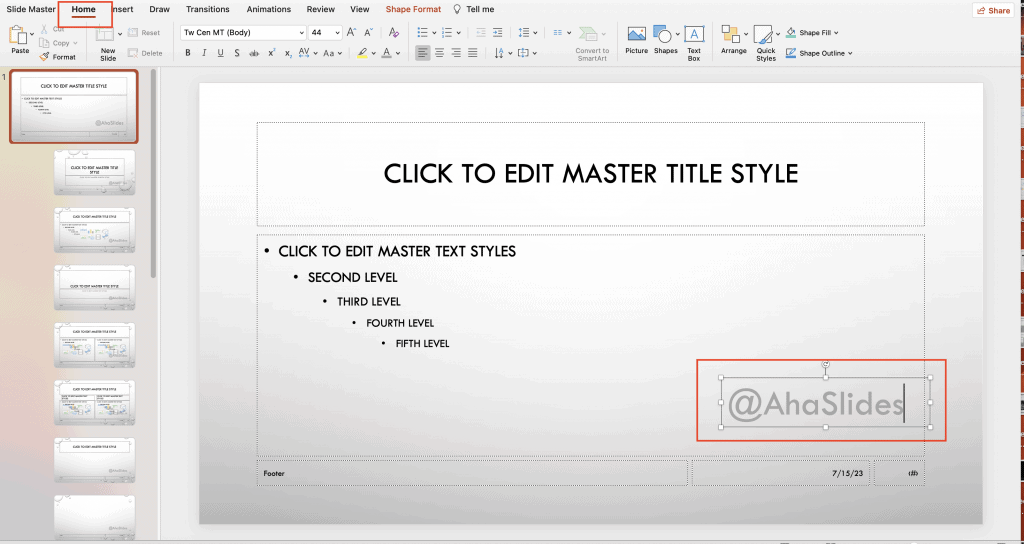
ステップ6: 透かしに満足したら、 「マスタービューを閉じる」 ボタンの 「スライドマスター」 タブをクリックしてスライド マスター ビューを終了し、通常のスライド ビューに戻ります。

ステップ7: これで、ウォーターマークがすべてのスライドに追加されました。 透かしを表示したい場合は、他の PPT プレゼンテーションに対してこのプロセスを繰り返すことができます。
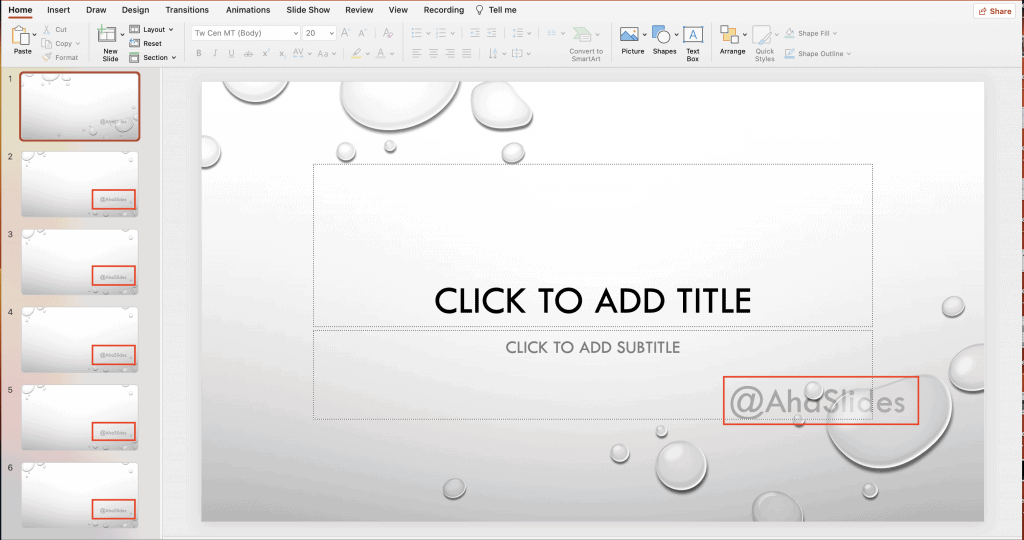
これで完了です!これらの簡単な手順に従うだけで、PowerPoint プレゼンテーションに透かしを簡単に追加し、プロフェッショナルな仕上がりにすることができます。
PowerPointで編集できない透かしを追加する方法
他の人が簡単に編集または変更できない PowerPoint に透かしを追加するには、次のようないくつかのテクニックを使用できます。
ステップ1: PowerPoint を開き、編集不可の透かしを追加するスライドに移動します。
ステップ2: 選択する スライドマスター ビュー。
ステップ3: 透かしとして使用したい「テキスト」または「画像」オプションをコピーします。
ステップ4: ウォーターマークを編集不可にするには、画像/テキストをコピーして背景として設定する必要があります。 「Ctrl + C」.
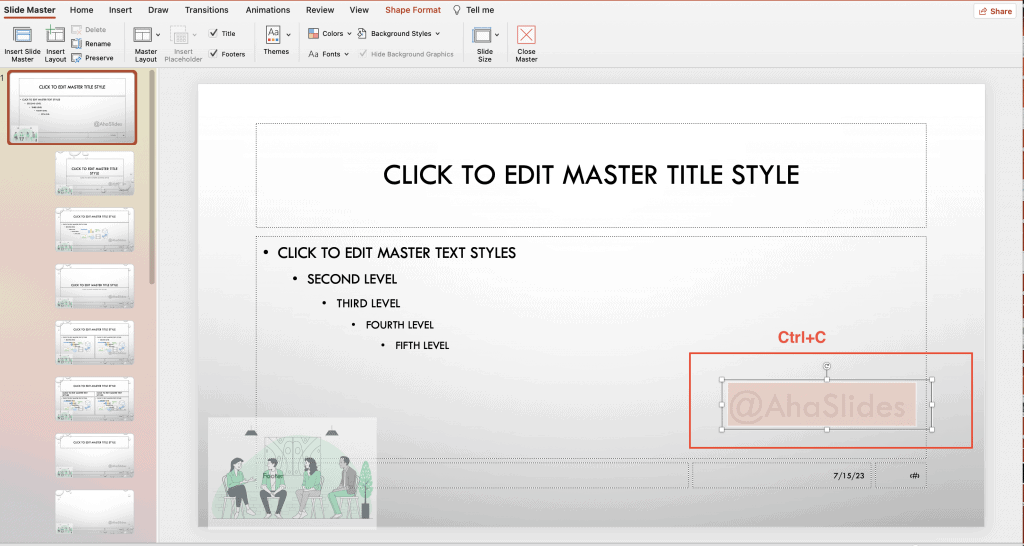
ステップ5: スライドの背景を右クリックして選択 「画像のフォーマット」 コンテキストメニューから選択します。

ステップ6: 「画像のフォーマット」 ペイン、に移動します "画像" タブには何も表示されないことに注意してください。
- というボックスをチェックします "塗りつぶし" 選択して 「画像またはテクスチャの塗りつぶし」.
- 次に、 「クリップボード」 ボックスにテキスト/画像を透かしとして貼り付けます。
- チェック 「透明性」 透かしを薄くして目立たなくします。

ステップ7: それを閉めて 「画像のフォーマット」 ペイン。
ステップ8: PowerPoint プレゼンテーションを保存して、透かし設定を保存します。
これらの手順に従って、他の人が編集または変更するのが難しい PowerPoint スライドに透かしを追加できます。
主要なポイント(要点)
PowerPoint の透かしは、機密性を示すテキストベースの透かしを使用する場合でも、画像ベースの透かしを使用する場合でも、プレゼンテーションの視覚的な魅力、ブランド化、および保護を強化できます。
透かしを追加することで、ビジュアルアイデンティティを確立し、コンテンツを保護できます。次回PowerPointプレゼンテーションを作成する際は、透かしの力を活用し、ぜひ取り入れてみてください。 あはスライド 没入型でインタラクティブな体験を創出します。 AhaSlidesの機能 多様であり、 ライブ投票, クイズ, インタラクティブなQ&Aセッションプレゼンテーションを魅力的かつインタラクティブなものにします。
ヒント: 使用する AhaSlidesはMentimeterの最良の代替品の1つです、トップクラス メンティの代わりになる7つの選択肢 2024中!
よくある質問
Powerpoint のウォーターマークとは何ですか?
パワーポイントスライドの透かしは、スライドの内容の背後に表示される半透明の画像またはテキストです。これは、知的財産を保護するための優れたツールであり、著作権の問題にも役立ちます。
PowerPoint に透かしを追加するにはどうすればいいですか?
PowerPoint に透かしを追加するには、先ほど説明した記事の 8 つの手順に従ってください。
Windows 10 で PowerPoint プレゼンテーションから透かしを削除するにはどうすればよいですか?
に基づく マイクロソフトのサポート, Windows 10 で PowerPoint プレゼンテーションからウォーターマークを削除する手順は次のとおりです。
1. [ホーム] タブで、選択ペインを開きます。 表示/非表示ボタンを使用して透かしを探します。 見つかったら削除してください。
2. スライドマスターを確認します。「表示」タブで「スライドマスター」をクリックします。スライドマスターとレイアウトに透かしがないか確認し、見つかった場合は削除します。
3. 背景を確認します。「デザイン」タブで「背景の書式設定」をクリックし、「塗りつぶし(単色)」を選択します。透かしが消えた場合は、画像塗りつぶしです。
4. 画像の背景を編集するには、右クリックして背景を保存し、画像エディタで編集します。 または、写真を完全に置き換えます。
5. すべてのスライド マスター、レイアウト、背景をチェックして、透かしを完全に削除します。 ウォーターマーク要素が見つかったら、削除または非表示にします。


