Ønsker du at få dine PowerPoint-præsentationer til at se professionelle og letgenkendelige ud? Hvis du ønsker at tilføje et vandmærke til dine PowerPoint-slides, er du kommet til det rette sted. I dette blogindlæg vil vi dykke ned i vigtigheden af en vandmærke i PowerPoint, giver enkle trin til, hvordan du tilføjer et vandmærke i PPT, og viser dig endda, hvordan du fjerner dem, når det er nødvendigt.
Gør dig klar til at låse op for det fulde potentiale af vandmærker og tage dine PowerPoint-præsentationer til næste niveau!
Indholdsfortegnelse
- Hvorfor har du brug for et vandmærke i PowerPoint?
- Sådan tilføjes et vandmærke i PowerPoint
- Sådan tilføjer du et vandmærke i PowerPoint, der ikke kan redigeres
- Nøgleforsøg
- Ofte Stillede Spørgsmål

Kom i gang på få sekunder..
Tilmeld dig gratis, og opbyg din interaktive PowerPoint ud fra en skabelon.
Prøv det gratis ☁️
Hvorfor har du brug for et vandmærke i PowerPoint?
Hvorfor har du egentlig brug for et vandmærke? Det er simpelt. Et vandmærke fungerer både som et visuelt brandingværktøj og en fordel for dine slides professionelle udseende. Det hjælper med at beskytte dit indhold, etablere ejerskab og sikre, at dit budskab efterlader et varigt indtryk på dit publikum.
Kort sagt er et vandmærke i PowerPoint et væsentligt element, der tilføjer troværdighed, unikhed og professionalisme til dine præsentationer.
Sådan tilføjes et vandmærke i PowerPoint
Det er nemt at tilføje et vandmærke til din PowerPoint-præsentation. Her er en trinvis vejledning:
Trin 1: Åbn PowerPoint, og naviger til det dias, hvor du vil tilføje vandmærket.
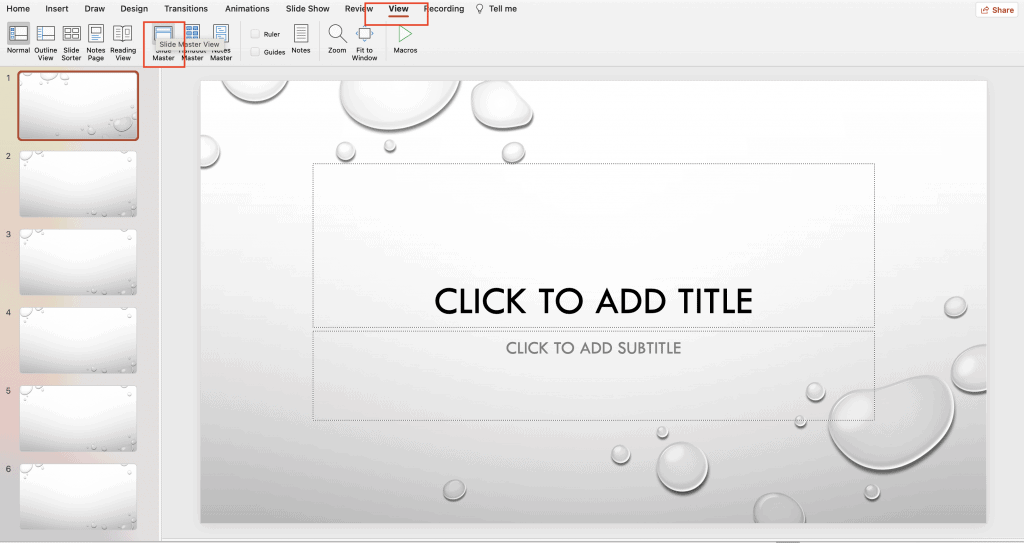
Trin 2: Klik på "Udsigt" fanen i PowerPoint-båndet øverst.
Trin 3: Klik på "Slidemaster".Dette åbner slidemaster-visningen.

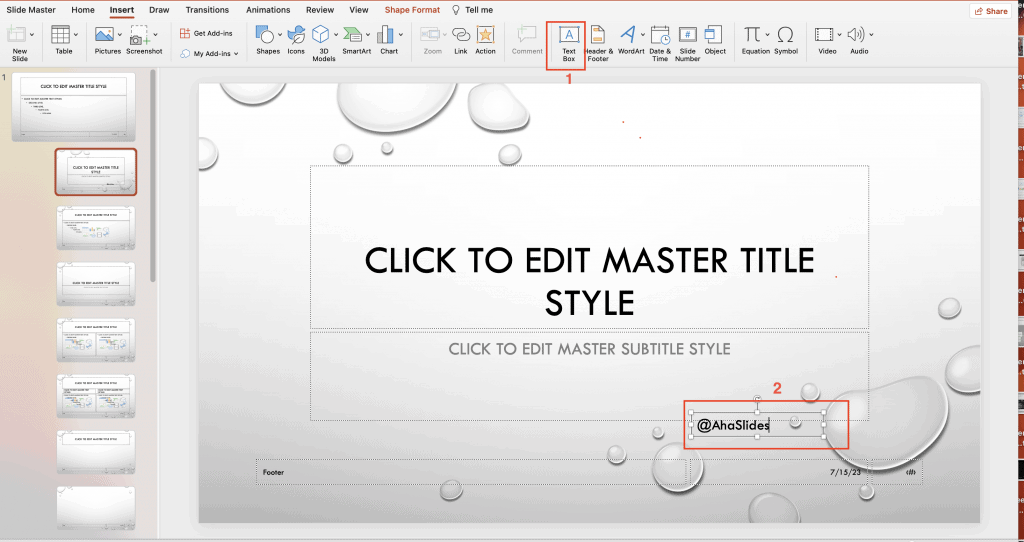
Trin 4: Vælg “Indsæt” fanen i Slide Master-visningen.

Trin 5: Klik på "Tekst" or "Billede" knappen i fanen "Indsæt", afhængigt af om du vil tilføje et tekstbaseret eller billedbaseret vandmærke.
- For et tekstbaseret vandmærke skal du vælge indstillingen "Tekstboks" og derefter klikke og trække på sliden for at oprette et tekstboks. Skriv den ønskede vandmærketekst, f.eks. dit brandnavn eller "Kladde", i tekstboksen.

- For et billedbaseret vandmærke skal du vælge "Billede" mulighed, gennemse din computer efter den billedfil, du vil bruge, og klik “Indsæt” for at tilføje det til diaset.
- Rediger og tilpas dit vandmærke som ønsket. Du kan ændre skrifttype, størrelse, farve, gennemsigtighed og placering af vandmærket ved hjælp af mulighederne i "Home" fane.

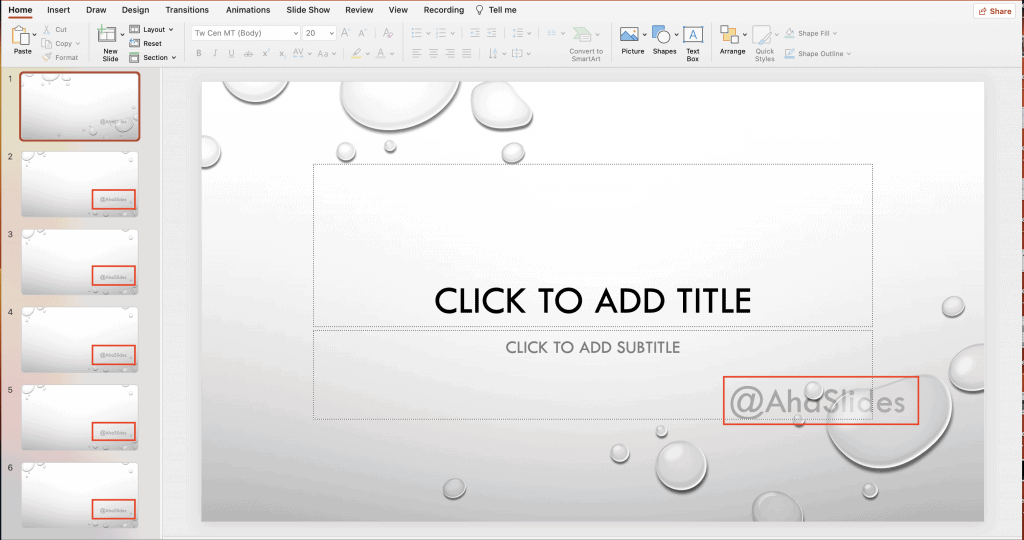
Trin 6: Når du er tilfreds med vandmærket, skal du klikke på "Luk mastervisning" knappen i "Slidemaster" fanen for at afslutte Slide Master-visningen og vende tilbage til den normale slide-visning.

Trin 7: Dit vandmærke er nu tilføjet til alle slides. Du kan gentage processen for andre PPT-præsentationer, hvis du ønsker, at vandmærket skal vises.

Det var det! Ved at følge disse enkle trin kan du nemt tilføje et vandmærke til din PowerPoint-præsentation og give den et professionelt præg.
Sådan tilføjer du et vandmærke i PowerPoint, der ikke kan redigeres
For at tilføje et vandmærke i PowerPoint, som ikke let kan redigeres eller ændres af andre, kan du bruge nogle teknikker som følger:
Trin 1: Åbn PowerPoint, og naviger til det dias, hvor du vil tilføje det uredigerbare vandmærke.
Trin 2: Vælg den Slide Master udsigt.
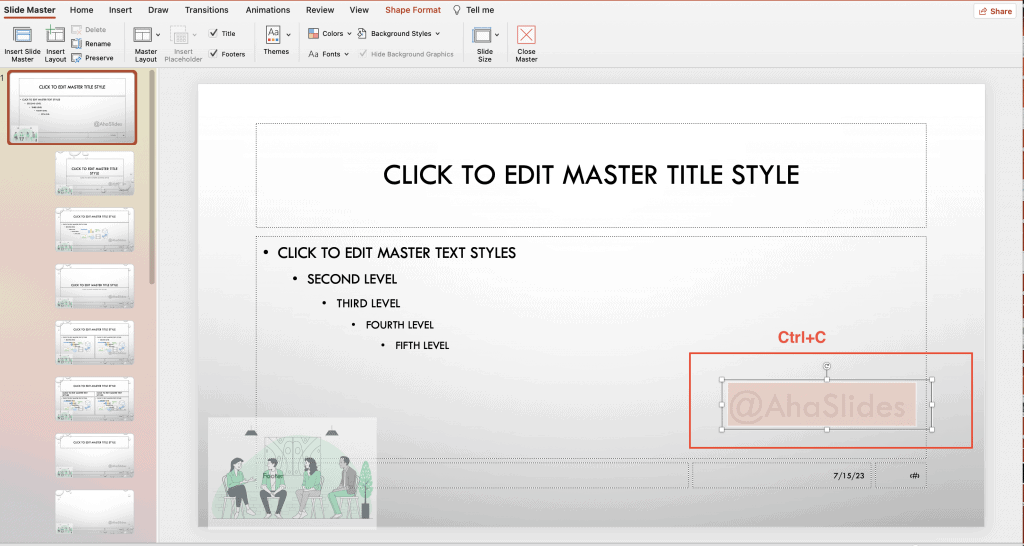
Trin 3: Kopier den "Tekst" eller "Billede", du vil bruge som vandmærke.
Trin 4: For at gøre vandmærket uredigerbart, skal du indstille billedet/teksten som baggrund ved at kopiere det med "Ctrl+C".

Trin 5: Højreklik på slidens baggrund og vælg "Formater billede" fra kontekstmenuen.

Trin 6: I "Formater billede" ruden, gå til "Billede" fane.
- Marker afkrydsningsfeltet, der siger "Fylde" Og vælg "Billede- eller teksturfyldning".
- Klik derefter på "Udklipsholder" boks for at indsætte din tekst/billede som et vandmærke.
- Check (Skak) "Gennemsigtighed" for at få vandmærket til at virke falmet og mindre fremtrædende.

Trin 7: Luk "Formater billede" rude.
Trin 8: Gem din PowerPoint-præsentation for at bevare vandmærkeindstillingerne.
Ved at følge disse trin kan du tilføje et vandmærke til dine PowerPoint-dias, som er mere udfordrende at redigere eller ændre af andre.
Nøgleforsøg
Et vandmærke i PowerPoint kan forbedre den visuelle appel, branding og beskyttelse af dine præsentationer, uanset om du bruger tekstbaserede vandmærker til at angive fortrolighed eller billedbaserede vandmærker.
Ved at tilføje vandmærker etablerer du en visuel identitet og beskytter dit indhold. Så næste gang du forbereder en PowerPoint-præsentation, så glem ikke at udnytte kraften i vandmærker og overvej at inkorporere dem. AhaSlides at skabe en fordybende og interaktiv oplevelse. AhaSlides funktioner er forskellige, herunder levende afstemninger, quizzerog interaktive Q&A-sessioner, hvilket gør dine præsentationer engagerende og interaktive.
Tips: Brug AhaSlides som et af de bedste alternativer til Mentimeter, blandt de bedste 7 alternativer til Menti i 2024!
Ofte stillede spørgsmål
Hvad er et PowerPoint-vandmærke?
PowerPoint-slidevandmærke er et semitransparent billede eller tekst, der vises bag indholdet af et slide. Dette er et fantastisk værktøj til at beskytte intellektuel intelligens, hvilket også hjælper med ophavsretsproblemer.
Hvordan tilføjer man et vandmærke i PowerPoint?
Du kan følge de 8 trin i artiklen, vi lige har leveret, for at tilføje et vandmærke i PowerPoint.
Hvordan fjerner jeg et vandmærke fra en PowerPoint-præsentation i Windows 10?
Baseret på Microsoft support, her er trinene til at fjerne et vandmærke fra en PowerPoint-præsentation i Windows 10:
1. Åbn markeringsruden på fanen Hjem. Brug Vis/Skjul-knapperne til at lede efter vandmærket. Slet den, hvis den findes.
2. Kontroller slidemasteren – klik på Slidemaster under fanen Vis. Se efter vandmærket på slidemasteren og layoutene. Slet, hvis det findes.
3. Kontroller baggrunden – klik på Formatér baggrund og derefter Helfyld under fanen Design. Hvis vandmærket forsvinder, var det en billedfyldning.
4. For at redigere en billedbaggrund skal du højreklikke, Gem baggrund og redigere i et billedredigeringsprogram. Eller udskift billedet helt.
5. Marker alle slidemastere, layouts og baggrunde for at fjerne vandmærket helt. Slet eller skjul vandmærkeelementet, når det findes.


