क्या आप अपने पावरपॉइंट प्रेजेंटेशन को प्रोफेशनल और आसानी से पहचानने योग्य बनाना चाहते हैं? अगर आप अपने पावरपॉइंट स्लाइड में वॉटरमार्क जोड़ना चाहते हैं, तो आप सही जगह पर आए हैं। इस ब्लॉग पोस्ट में, हम वॉटरमार्क के महत्व पर विस्तार से चर्चा करेंगे। पावरपॉइंट में वॉटरमार्क, पीपीटी में वॉटरमार्क जोड़ने के सरल चरण प्रदान करते हैं, और यहां तक कि आपको यह भी बताते हैं कि आवश्यकता पड़ने पर उन्हें कैसे हटाया जाए।
वॉटरमार्क की पूरी क्षमता को अनलॉक करने और अपनी पावरपॉइंट प्रस्तुतियों को अगले स्तर पर ले जाने के लिए तैयार हो जाइए!
विषय - सूची
- आपको PowerPoint में वॉटरमार्क की आवश्यकता क्यों है?
- पावरप्वाइंट में वॉटरमार्क कैसे जोड़ें
- पावरपॉइंट में वॉटरमार्क कैसे जोड़ें जिसे संपादित नहीं किया जा सकता
- चाबी छीन लेना
- अक्सर पूछे जाने वाले प्रश्न

सेकंड में शुरू करें..
नि:शुल्क साइन अप करें और एक टेम्पलेट से अपना इंटरेक्टिव पावरपॉइंट बनाएं।
इसे मुफ़्त में आज़माएं ️
आपको PowerPoint में वॉटरमार्क की आवश्यकता क्यों है?
आपको वॉटरमार्क की ज़रूरत क्यों है? खैर, यह आसान है। वॉटरमार्क एक विज़ुअल ब्रांडिंग टूल और आपकी स्लाइड्स की पेशेवर उपस्थिति के लिए फ़ायदेमंद दोनों के रूप में काम करता है। यह आपकी सामग्री की सुरक्षा करने, स्वामित्व स्थापित करने और यह सुनिश्चित करने में मदद करता है कि आपका संदेश आपके दर्शकों पर एक स्थायी छाप छोड़े।
संक्षेप में, पावरपॉइंट में वॉटरमार्क एक आवश्यक तत्व है जो आपकी प्रस्तुतियों में विश्वसनीयता, विशिष्टता और व्यावसायिकता जोड़ता है।
पावरप्वाइंट में वॉटरमार्क कैसे जोड़ें
अपने पावरपॉइंट प्रेजेंटेशन में वॉटरमार्क जोड़ना बहुत आसान है। यहाँ चरण-दर-चरण मार्गदर्शिका दी गई है:
चरण 1: पावरपॉइंट खोलें और उस स्लाइड पर नेविगेट करें जहां आप वॉटरमार्क जोड़ना चाहते हैं।
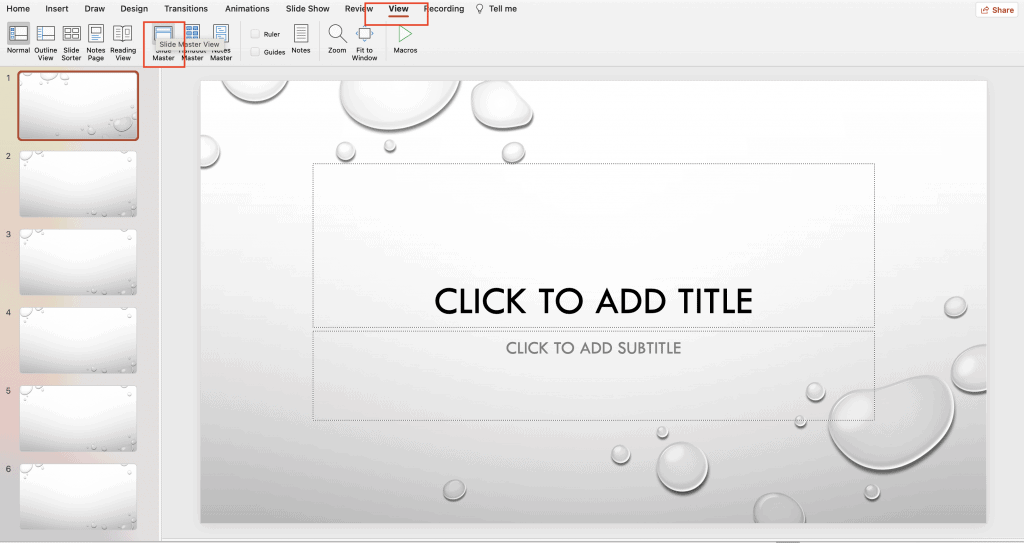
चरण १: पर क्लिक करें "राय" शीर्ष पर PowerPoint रिबन में टैब करें।
चरण १: पर क्लिक करें "स्लाइड स्वामी।” इससे स्लाइड मास्टर दृश्य खुल जाएगा।

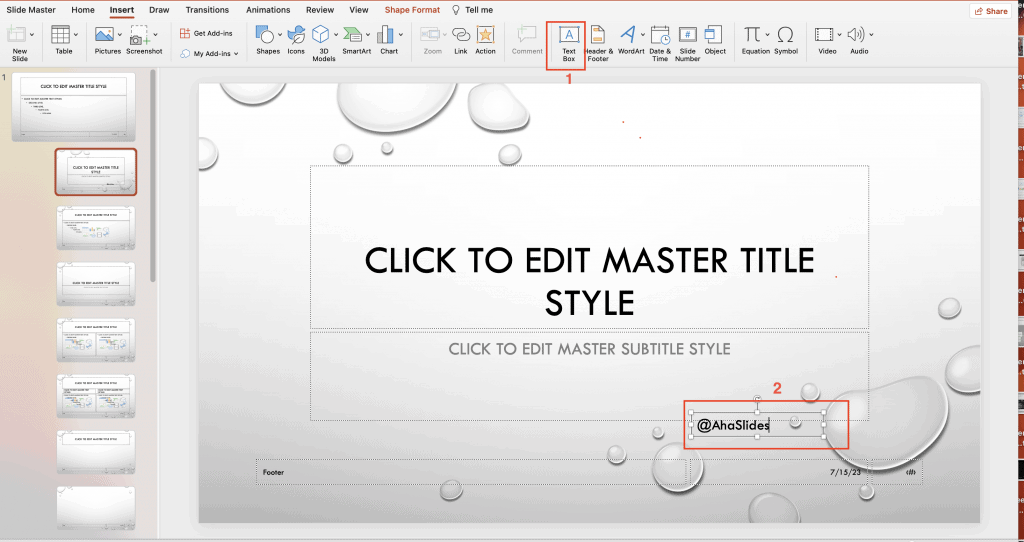
चरण १: चयन "सम्मिलित करें" स्लाइड मास्टर दृश्य में टैब।

चरण १: पर क्लिक करें "पाठ" or "चित्र" "सम्मिलित करें" टैब में बटन, इस पर निर्भर करता है कि आप पाठ-आधारित या छवि-आधारित वॉटरमार्क जोड़ना चाहते हैं।
- टेक्स्ट-आधारित वॉटरमार्क के लिए, “टेक्स्ट बॉक्स” विकल्प चुनें, और फिर टेक्स्ट बॉक्स बनाने के लिए स्लाइड पर क्लिक करें और खींचें। टेक्स्ट बॉक्स में अपना मनचाहा वॉटरमार्क टेक्स्ट, जैसे कि आपका ब्रांडिंग नाम या “ड्राफ़्ट” टाइप करें।

- छवि-आधारित वॉटरमार्क के लिए, चुनें "चित्र" विकल्प, उस छवि फ़ाइल के लिए अपने कंप्यूटर को ब्राउज़ करें जिसे आप उपयोग करना चाहते हैं और क्लिक करें "सम्मिलित करें" इसे स्लाइड में जोड़ने के लिए.
- अपने वॉटरमार्क को इच्छानुसार संपादित और अनुकूलित करें। आप विकल्पों का उपयोग करके वॉटरमार्क का फ़ॉन्ट, आकार, रंग, पारदर्शिता और स्थिति बदल सकते हैं "घर" टैब.

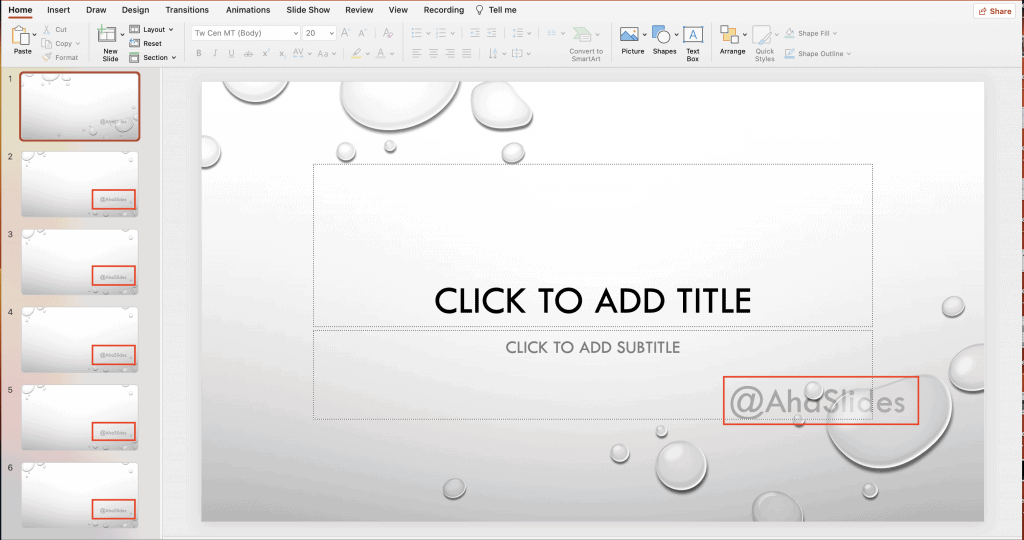
चरण १: एक बार जब आप वॉटरमार्क से संतुष्ट हो जाएं, तो पर क्लिक करें “मास्टर दृश्य बंद करें” में बटन "स्लाइड स्वामी" स्लाइड मास्टर दृश्य से बाहर निकलने और सामान्य स्लाइड दृश्य पर लौटने के लिए टैब पर क्लिक करें।

चरण १: आपका वॉटरमार्क अब सभी स्लाइडों में जुड़ गया है। यदि आप वॉटरमार्क दिखाना चाहते हैं तो आप अन्य पीपीटी प्रस्तुतियों के लिए प्रक्रिया दोहरा सकते हैं।

बस इतना ही! इन सरल चरणों का पालन करके, आप आसानी से अपने पावरपॉइंट प्रेजेंटेशन में वॉटरमार्क जोड़ सकते हैं और इसे पेशेवर स्पर्श दे सकते हैं।
पावरपॉइंट में वॉटरमार्क कैसे जोड़ें जिसे संपादित नहीं किया जा सकता
PowerPoint में एक वॉटरमार्क जोड़ने के लिए जिसे दूसरों द्वारा आसानी से संपादित या संशोधित नहीं किया जा सकता है, आप निम्नानुसार कुछ तकनीकों का उपयोग कर सकते हैं:
चरण १: PowerPoint खोलें और उस स्लाइड पर नेविगेट करें जहाँ आप असंपादनीय वॉटरमार्क जोड़ना चाहते हैं।
चरण १: चुनना स्लाइड स्वामी राय।
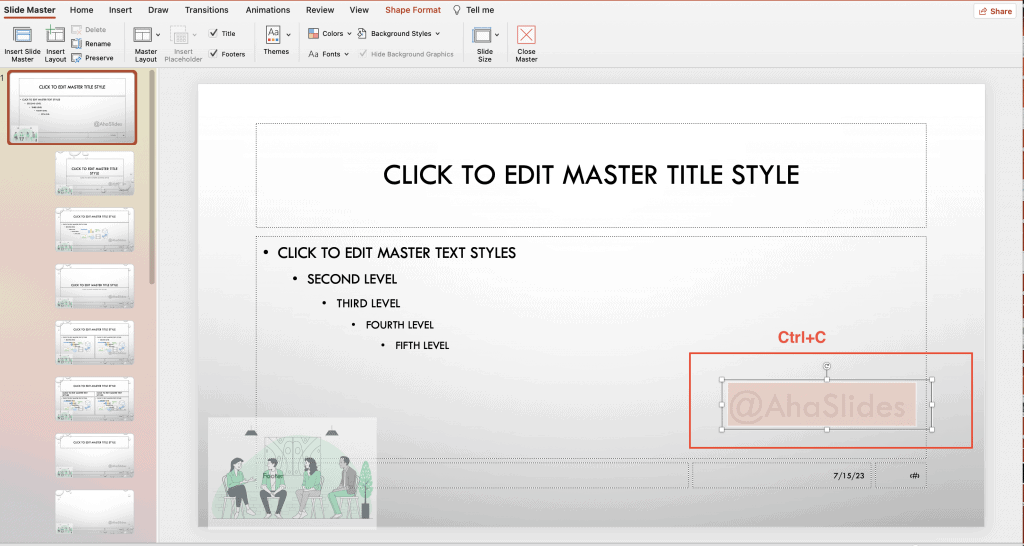
चरण १: उस “टेक्स्ट” या “इमेज” विकल्प को कॉपी करें जिसे आप वॉटरमार्क के रूप में उपयोग करना चाहते हैं।
चरण १: वॉटरमार्क को संपादन योग्य बनाने के लिए, आपको छवि/पाठ को कॉपी करके पृष्ठभूमि के रूप में सेट करना होगा “Ctrl+सी”.

चरण १: स्लाइड की पृष्ठभूमि पर राइट-क्लिक करें और चुनें “चित्र प्रारूपित करें” संदर्भ मेनू से

चरण १: में “चित्र प्रारूपित करें” फलक, पर जाएँ "चित्र" टैब.
- बॉक्स को चेक करें जो कहता है "भरना" और चुनें “चित्र या बनावट भरें”.
- फिर क्लिक करें "क्लिपबोर्ड" अपने टेक्स्ट/छवि को वॉटरमार्क के रूप में चिपकाने के लिए बॉक्स।
- चेक “पारदर्शिता” वॉटरमार्क को फीका और कम प्रमुख दिखाने के लिए।

चरण १: बंद करो “चित्र प्रारूपित करें” फलक।
चरण १: वॉटरमार्क सेटिंग्स को संरक्षित करने के लिए अपनी पावरपॉइंट प्रस्तुति को सहेजें।
इन चरणों का पालन करके, आप अपनी पावरपॉइंट स्लाइड्स में वॉटरमार्क जोड़ सकते हैं जिन्हें दूसरों द्वारा संपादित या संशोधित करना अधिक चुनौतीपूर्ण है।
चाबी छीन लेना
पावरपॉइंट में वॉटरमार्क आपके प्रस्तुतीकरण की दृश्य अपील, ब्रांडिंग और सुरक्षा को बढ़ा सकता है, चाहे आप गोपनीयता दर्शाने के लिए पाठ-आधारित वॉटरमार्क का उपयोग कर रहे हों या छवि-आधारित वॉटरमार्क का।
वॉटरमार्क जोड़कर, आप एक विज़ुअल पहचान स्थापित करते हैं और अपनी सामग्री की सुरक्षा करते हैं। इसलिए, अगली बार जब आप पावरपॉइंट प्रेजेंटेशन तैयार कर रहे हों, तो वॉटरमार्क की शक्ति का लाभ उठाना न भूलें और वॉटरमार्क को शामिल करने पर विचार करें। अहास्लाइड्स एक इमर्सिव और इंटरैक्टिव अनुभव बनाने के लिए। AhaSlides की विशेषताएं विविध हैं, जिनमें शामिल हैं लाइव चुनाव, quizzes, तथा इंटरैक्टिव प्रश्नोत्तर सत्र, आपकी प्रस्तुतियाँ आकर्षक और इंटरैक्टिव बन जाएंगी।
युक्तियाँ: उपयोग करें AhaSlides मेन्टीमीटर के सर्वोत्तम विकल्पों में से एक है, शीर्ष में से मेंटी के विकल्प के रूप में 7 विकल्प 2024 में!
अक्सर पूछे जाने वाले प्रश्न
पावरपॉइंट वॉटरमार्क क्या है?
पावरपॉइंट स्लाइड वॉटरमार्क एक अर्ध-पारदर्शी छवि या पाठ है, जो स्लाइड की सामग्री के पीछे दिखाई देता है। यह बौद्धिक बुद्धिमत्ता की रक्षा करने के लिए एक बढ़िया उपकरण है, जो कॉपीराइट मुद्दों में भी मदद करता है
पावरपॉइंट में वॉटरमार्क कैसे जोड़ें?
आप PowerPoint में वॉटरमार्क जोड़ने के लिए हमारे द्वारा प्रदान किए गए लेख में दिए गए 8 चरणों का पालन कर सकते हैं।
मैं विंडोज़ 10 में पावरपॉइंट प्रेजेंटेशन से वॉटरमार्क कैसे हटाऊं?
पर आधारित Microsoft समर्थन, यहां विंडोज 10 में पावरपॉइंट प्रेजेंटेशन से वॉटरमार्क हटाने के चरण दिए गए हैं:
1. होम टैब पर, चयन फलक खोलें। वॉटरमार्क देखने के लिए दिखाएँ/छिपाएँ बटन का उपयोग करें। पाए जाने पर इसे हटा दें.
2. स्लाइड मास्टर की जाँच करें - व्यू टैब पर, स्लाइड मास्टर पर क्लिक करें। स्लाइड मास्टर और लेआउट पर वॉटरमार्क देखें। अगर मिले तो उसे हटा दें।
3. बैकग्राउंड चेक करें - डिज़ाइन टैब पर, फ़ॉर्मेट बैकग्राउंड और फिर सॉलिड फ़िल पर क्लिक करें। अगर वॉटरमार्क गायब हो जाता है, तो यह एक पिक्चर फ़िल था।
4. किसी चित्र की पृष्ठभूमि को संपादित करने के लिए, राइट-क्लिक करें, पृष्ठभूमि सहेजें, और एक छवि संपादक में संपादित करें। या चित्र को पूरी तरह बदल दें.
5. वॉटरमार्क को पूरी तरह से हटाने के लिए सभी स्लाइड मास्टर्स, लेआउट और पृष्ठभूमि की जाँच करें। वॉटरमार्क तत्व पाए जाने पर उसे हटा दें या छिपा दें।


